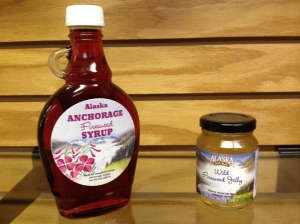
It’s bright, it’s red, it can survive in earth that’s been scorched bare of anything living, and it’s everywhere as far as the eye can see!
Fireweed is one of those rare instances of a species that is acceptably aggressive in its bid to multiply and take up space. It’s as common as any other plant burdened as a weed, but unlike said brethren you won’t find many folk pressing to have it removed from their yards or parks. Its vibrant flowers and superb ability to adapt to any kind of soil have made it a hallmark of the 49th. It looks pretty, its good at reintroducing vegetation to land that’s been otherwise rendered barren, it has no qualms about the constant zig-zag of temperatures inherent to the Arctic, and of course, it can be used to make some tasty snacks.
The versatility of this iconic plant in cooking is what first drew me to the idea of exploring the applications for Alaskan flora to household garnishes such as jams and syrups, and 20 years down the line it still remains one of my all time favorites.
Upon mentioning it in a post on my facebook page some moons back, I was asked exactly how does one get syrup and such from a flowering plant. Well no time like the present for answers so here’s a little insight into how you can go about obtaining some sweet and savory fireweed goodness:
Okay, okay seriously, if your local grocers doesn’t stock my goods (shame on them), here’s how you can make it at home:
Jack’s Wild Fireweed Syrup, made simple
INGREDIENTS
7 1/2 cups fireweed blossoms (depending on where you live you may be able to just walk out and gather them from the woods. If not, most nurseries will sell seeds and starter plants for you to grow your own. It makes a lovely addition to any flower bed, both in looks and ease of care).
6 cups water
1 1/2 cups sugar
3 tablespoons lemon juice
PREPARATION
1. Syrup only requires the flowers of fireweed so snip off the rest of the plant and discard. Place the blossoms in a large saucepan and add 5 cups water.
2. Heat the flowers gently till the colour starts to drain out of them. You’ll want to eventually end up with a mixture of dark red liquid and white shrivelled leftovers.
3. Strain the leftovers out of the liquid and set it aside.
4. In another small saucepan combine the sugar and remaining water, heat and stir till the sugar dissolves completely.
5. Mix the fireweed liquid and sugar water together, then stir in the lemon juice.
6. Return the resulting mixture to the heat and simmer until it’s been reduced to about half.
7. Pour the finished syrup into your canning jars and seal them up. Stick ’em in the fridge if you want to speed up the final bit, then break out the ice cream, sourdough pancakes, waffles, and whatever else you can find that goes with syrup.
Now while syrup lends itself to many uses as a garnish, it’s only one of fireweed’s many applications. The other popular one is, of course, jelly and the process for that is about as doable. So while I’m at it, here’s how you can get two treats from one flower:
Jack’s Wild Fireweed Jam, made simple
INGREDIENTS
8 cups fireweed blossoms
1/2 tsp butter
1 3/4 cups dry pectin
3 cups granulated sugar
1 tsp lemon juice
PREPARATION
1. Repeat the snip and disposal of the stems, then rinse the blossoms thoroughly.
2. Place blossoms in saucepan and add just enough water so the level of liquid is right underneath the top of the flowers when they’re packed in. Don’t worry about getting this exact as all that will happen is the juice will be slightly more brown than purple in color if too much water was used. Heck, depending on how much jam you’re planning to make overdoing the water might actually be beneficial since it’ll give you more juice to work with.
3. Heat to boiling and gently stir the blossoms as the color comes out. Continue till petals have gone grey and the water is a deep purple/brown. Strain to get rid of the petals.
4. Add lemon juice and butter and warm the mixture on the stove (ideally you’ll want to turn down the heat for this as it’s more of an interim between boils. Don’t worry there’s still plenty of boiling to come!).
5. Add the pectin and turn the heat back up to boil (see, what’d I tell ya?). Boil the mixture hard for a minute.
6. Reduce heat and stir in sugar, then boil again for a minute. You’ll probably have some residue building up on the top so skim that stuff off.
7. If you have a pitcher handy (that isn’t glass) pour the mixture into it. This will make it easier to get an equal amount into each of your jars. If there’s no pitcher available (shame) a keen eye and a steady grip on the saucpan handle will do. Make sure you skim any additional residue off first.
8. Fill up those jars, making sure you leave a little bit of space at the top. Close ’em and let ’em soak in a hot water bath for about 10 – 20 minutes.
10. Pop some bread or english muffins in the toaster, arm yourself with a knife and start enjoying your freshly prepared fireweed jam! No other taste like it anywhere in the Last Frontier or out!


